Add Vale to your repository
This guide presents a straightforward Vale setup workflow for a repository, including editor integration in VS Code. It is included here as a docs-tooling sample with repeatable installation and configuration steps.
This guide explains how to install Vale and the Vale VS Code extension in your repository.
Prerequisites
Before you begin, ensure you have the following:
- A Git repository where you plan to install Vale.
- Visual Studio Code installed on your machine.
- A basic understanding of terminal commands.
Install Vale
To install Vale, follow these steps:
In a terminal, navigate to your project directory:
cd your-project
Install Vale for your operating system:
- Windows
- macOS
- Linux
choco install vale
See Chocolatey for more information.
brew install vale
See Homebrew for more information.
sudo snap install vale
See Snapcraft for more information.
Create the Vale configuration file:
touch .vale.ini
Open the .vale.ini file:
nano .vale.ini
Go to the Vale Config Generator page to generate the configuration file.
 Vale Config Generator page
Select a base style from the Base style list. Options include:
- Skip for now
- Microsoft Writing Style Guide
- Google Developer Documentation Style Guide
- Red Hat Documentation Style Guide
Select a supplementary style from the Supplementary style list. Options include:
- proselint
- write-good
- alex
- Readability
- Joblint
Select a static site generator from the Static site generator list. Options include:
- None
- Hugo
Copy the generated output. This example selects the following options:
- Google Developer Documentation Style Guide
- proselint
- write-good
- None
Paste the configuration output into the .vale.ini file:
StylesPath = styles

MinAlertLevel = suggestion

Packages = Google, proselint, write-good

[*]
BasedOnStyles = Vale, Google, proselint, write-good
Optional: To configure Vale to lint only Markdown files, modify the target pattern in your .vale.ini file as follows:
StylesPath = styles

MinAlertLevel = suggestion

Packages = Google, proselint, write-good

[*.md]
BasedOnStyles = Vale, Google, proselint, write-good
Press Ctrl+O and Return to save and close the file.
Initialize the Vale configuration:
vale sync
This command creates a styles directory with subdirectories for each selected style:
...
styles/
├── Google/
│   ├── ...
├── proselint/
│   ├── ...
├── write-good/
│   ├── ...
...
Test your configuration
To test your Vale configuration, follow these steps:
To run the linter against all the Markdown files in your repository, run the following command:
vale .
To lint files in a specific directory or file, specify its path in the command. The following command lints all the Markdown files in the docs directory:
vale docs/
You should see the different Vale responses in your terminal:
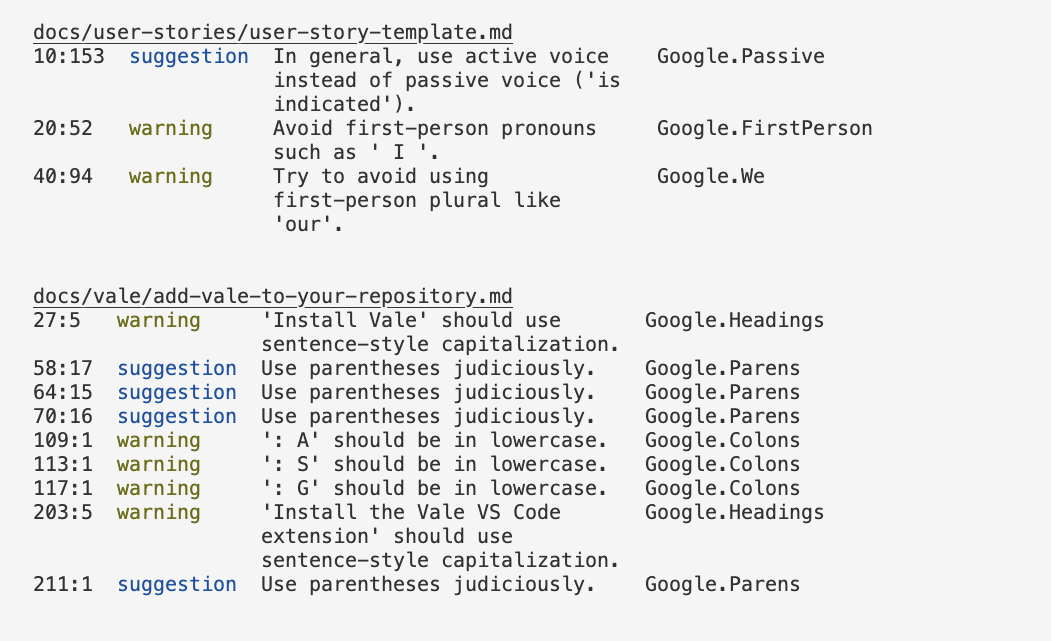 Vale in terminal
Install the Vale VS Code extension
To install the Vale VS Code extension, follow these steps:
Open Visual Studio Code and go to the Extensions tab.
Search for Vale VSCode in the Marketplace.
Click Install.
Restart Visual Studio Code.
Outcome
Vale should now be running in your text editor:
- Red underlines indicate errors.
- Yellow underlines indicate warnings.
- Blue underlines indicate suggestions.
Next steps
- Create custom rules for Vale.
- Use GitHub Actions to automate Vale checks.
- Integrate Reviewdog to comment on pull requests based on Vale results.